Omelette.

I didn’t know that I could make omelette. In the Allcock family it is traditionally something that only my Dad makes, so when Emma requested it for her cooking lesson I have to admit that my heart sank a little. I wasn’t confident to make it up as I went along as I usually do so I dutifully scouted the internet for a recipe and came across one by Jamie Oliver – I reckoned that he probably knew what he was talking about so I went with using his basic recipe.

Emma and I added artichoke, bacon and olives to our omelettes which was delicious. The joy of this recipe is that you can add all sorts of things, and can do each one differently if you have picky people to cook for. It’s good for using up leftovers – I am quite tempted to make one with some leftover roast chicken tomorrow – and you can throw all sorts of store-cupboard bits at it to make it more interesting.

Omelette

Basic Ingredients
For one person

  • 2 large free-range eggs
  • salt
  • black pepper
  • 1 small knob butter
  • 1 small handful Cheddar cheese , grated

Method for a Basic omelette:

  1. Crack the eggs into a mixing bowl with a pinch of salt and pepper. Beat well with a fork.
  2. Put a small frying pan on a low heat and let it get hot. Add a small knob of butter. When the butter has melted and is bubbling, add your eggs and move the pan around to spread them out evenly. When the omelette begins to cook and firm up, but still has a little raw egg on top, sprinkle over the cheese.
  3. Using a spatula, ease around the edges of the omelette, then fold it over in half. When it starts to turn golden brown underneath, remove the pan from the heat and slide the omelette on to a plate.

Method using added yummy stuff:

Follow the recipe above; but prepare the extra bits (some may need cooking first) and then when you get to Stage 3 put them on top of the cheese before you fold it over.

Some examples of things you might like to add:

  • Mushrooms
  • Ham
  • Tuna
  • Sweetcorn
  • Spinach
  • Bacon
  • Onion
  • Cooked chicken
  • Courgette

Some of these will need grilling or frying first, such as the bacon, courgette and onion.

Please do share with me your omelette creations – I would love to know what weird, wonderful & delicious combinations you use!

wp-1469183382615.jpg

James Learns to Cook – Part 2

I have had a complaint recently that there have been no more ‘James Learns to Cook Posts’ – very remiss of me! I have just been looking through my phone at photographs and came across some from a cooking lesson that I had failed to write up – good old British Spag Bol – oh, hang on, pasta’s European isn’t it? Oh well (… and that’s about as political as I will ever get on this blog!).

I don’t have a photo of the finished product because I had deleted it before I remembered why I had taken it, it was rather delicious though.

Enjoy!

wp-1467213241829.jpg
… and here boys and girls is how one chops and onion.

Ingredients

  • an onion
  • a clove or two of garlic
  • minced beef (about 150g per person is about right)
  • a tin of tomatoes
  • some fresh tomatoes (only because I happened to have some which needed using up)
  • a squeeze of tomato puree
  • a beef stock cube
  • oregano
  • black pepper
  • spaghetti
  • grated cheese

Method

I think that the pictures below are pretty clear, but in essence…

Chop the onion and garlic, as finely as you can comfortably do without crying uncontrollably, and then fry them in some olive oil along with the oregano and pepper.

When the onions are beginning to  become ‘transparent’ add the minced beef and break it up with a spoon or spatula, adding more oil if it begins to stick. At this point I sometimes add a splash of red wine if I have some open; I don’t tend to bother opening a bottle just for this purpose (although it can be a good excuse). James only drinks Cava so that doesn’t help much.

When the mince is beginning to brown, crumble the stock cube into it and add the fresh tomatoes, tomato puree and tinned tomatoes. Allow this lovely mixture to simmer for about ten minutes, cover with a lid if you have one.

Grate some cheese and then cook the pasta, following the instructions on the packet. Taste the beef before serving and add more salt and pepper if necessary.

Pop-tastic mate!

wp-1467296431057.jpg

Pasta with Green Pesto, Mozzarella and Chicken

Cooking lesson number three with Emma!

Emma told me that she really likes mozzarella and courgette (zucchini for you Aussies), so for our third cooking lesson we cooked pasta with chicken, mozzarella and courgette. However, we decided on tasting it that it was a bit too bland for our liking and just a little bit too dry. I asked Emma what she thought we could have done differently and she came up with adding some lemon juice and some paprika; she tried this adapted recipe a couple of days later and apparently it was delicious.

The recipe given below is with Emma’s amendments. Enjoy.

wp-1467190431119.jpg

Ingredients

These amounts feed one person – double it if you are cooking for a friend.

  • 1 cup of pasta
  • A tablespoon of olive oil
  • Diced Chicken
  • ½ Courgette
  • 2 tablespoons lemon juice
  • 1/2 teaspoon paprika (you can add more if you like)
  • 1 tablespoon of Green pesto
  • ½ Mozzarella ball
  • Salt and pepper

Method

Heat a tablespoon of oil in a frying pan, add the chicken, paprika and a grind of pepper and fry it stirring frequently. Chop the courgette into rounds. When the chicken is sealed (cooked on the outside) add the courgette and lemon juice and continue to stir. Turn the heat down if the chicken starts to stick to the pan.

While the chicken is cooking boil the kettle for the pasta. Put the pasta in a saucepan with a grind of salt and a tiny splash of oil, add the boiling water and give it a little stir so that the pasta doesn’t stick together. Cook on a medium heat.

Next, slice the mozzarella ball into circles.

When the pasta is cooked drain it and then put it back in the saucepan along with the Pesto, give it a good stir.

Check that the chicken is cooked all the way through by taking the biggest piece and cutting it in half.

Put the pasta onto a plate, arrange the mozzarella on top, and then put the chicken and courgette on top of that – the heat from the pasta and the chicken will make the mozzarella nice and melty.

wp-1467190731434.jpg

Pasta Carbonara – with Bacon & Crème fraîche

This is a simple (and delicious) take on pasta carbonara, which Emma and I made for her second cooking lesson. Emma said that she made it again later in the week and it was just as wonderful.

I’m afraid I didn’t take the best photographs ever for this post – partly because I had lost my phone and was using a strange camera, but mostly because I was too impatient to scoff the lot!

PTDC0026.JPG

Ingredients

These quantities are for one person, if you are feeding someone else it is easy to double it (or triple it!).

  • One Cup of Pasta
  • One tablespoon of Olive oil
  • Two rashers of bacon
  • One clove of Garlic
  • ½ teaspoon of Dried Oregano
  • A small onion
  • Four Mushrooms (we didnt’t end up putting these in because Emma is not a fan, you could substitute in courgette instead)
  • Two tablespoons of Crème fraîche
  • A handful of grated cheese
  • Salt and pepper

Method

Chop the onion and garlic and add to a frying pan with a tablespoon of olive oil (we used some  basil olive oil – yummy), along with a couple of grinds of black pepper and the oregano. Turn the hob on to a medium heat.

Using scissors, chop up the bacon into small pieces and add to the frying pan. Give everything a good stir.

Chop the mushrooms and add these to the pan.

Next, boil the kettle for the pasta. Put the pasta in a saucepan with a grind of salt and a tiny splash of oil, add the boiling water and give it a little stir so that the pasta doesn’t stick together. Cook on a medium heat.

While the pasta is cooking, grate the cheese.

When the onion and garlic is beginning to look nice and browned then turn off the heat (you can leave the pan in place). When the pan is no longer sizzling add the Crème fraîche, a tablespoon or two of the hot water from the pasta and half of the cheese.

When the pasta is cooked, drain it and then add it to the frying pan. Put the heat back on low below the frying pan and give everything a nice stir until the cheese is melted.

Serve with the extra cheese on top and salt and pepper to taste.

PTDC0030.JPG

Gin and Tonic Tart!

Sarah* and I have been drooling over this recipe for months and we finally got around to  making it one sunny weekend in May; it certainly lived up to expectations! In Sarah’s own words…

Gin and Tonic Tart
Serve with a decorative cat and some sunshine… and of course Gin!

When Kitty’s Kitchen came to visit me in deepest Hampshire (I like the idea of Kitty’s Kitchen being a vibe of relaxed and joyful cooking which follows me wherever I go – thanks Sarah! Ed.), a mere stone’s throw from the Bombay Sapphire distillery we made sure to put the local produce to good use. It seemed only right to make a Gin & Tonic tart we had been sharing with each other for over a year and I won’t go too heavily into detail because the recipe is pretty clear and the images speak for themselves.

Gin and Tonic Tart

We found that the pastry shrank fairly dramatically in the oven (which could be a problem of temperature and humidity but is always a danger when one isn’t familiar with baking in a particular oven). I think it is worth being quite generous with the edges on a first attempt to avoid this since too much shrinkage leaves less base to contain your filling; I speak from experience!

However, the whole was very pleasing; the filling zesty and smooth, the pastry light and the syrup gave an excellent added tang. I am not normally a fan of fiddly desserts but this one came out excellently and I would certainly do it again.

The gin and tonic syrup kept very well in the fridge, so well that it made it back to Northamptonshire and became the base of a blended gin for my Grandmother who was finding her dry gin too sharp having been spoiled with Edinburgh Gin Elderflower Liqueur for Christmas.

* who I call ‘wine-maker Sarah’; as opposed to ‘Australian Sarah’ who is writing a post for us later in the week, my sister Sarah… and the many other lovely ladies in my life of that name.

Gin and Tonic Tart

Gin and Dubonnet Sponge Cake

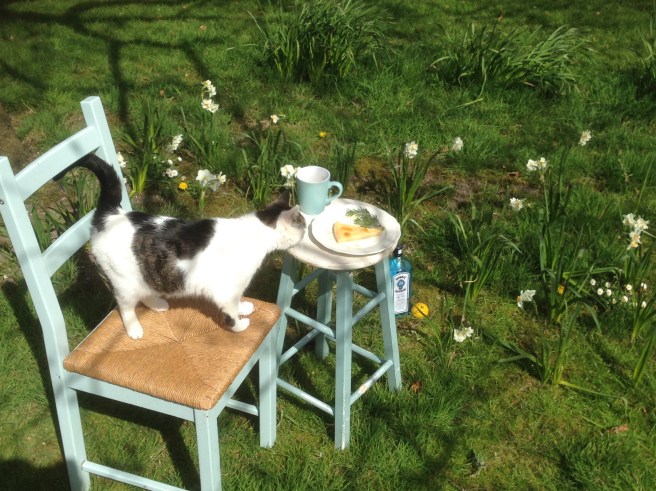
We are continuing to celebrate Kitty’s Storecupboard Gin Week, so in the words of the lovely Vicky…

I’ve always been one for a spot of baking (next to eating it’s my favourite thing!) and I’ve recently been pondering starting a blog so when Katherine asked me to do a guest post for her blog I was straight on it!

This particular post celebrates two national treasures – Her Majesty the Queen, and Gin. This year is queenies 90th birthday and this weekend it just happens to be World Gin Day. Legend has it that our Liz’s favourite tipple is the classic ‘gin and dubonnet’, so I decided it was only right and proper to use this as inspiration for my latest bake.

I’m always one for an easy life so decided to use a classic (and easy!) Victoria sponge as the basis for the cake. I can safely say the hardest part about it was finding somewhere that sells dubonnet! Sadly it’s not the most popular of drinks so can be hard to track down but definitely worth it – it’s got a light fruity flavour which works really nicely in this cake, and it’s not half bad in a gin cocktail either!

Gin cake
Ingredients
6oz butter (actually I am a stork devotee but whichever you prefer)
6oz caster sugar
3 eggs
6oz self-raising flour
3tbsp gin and dubonnet (equal measures, so 1.5tbsp of each)
300ml double cream
approx 3tbsp icing sugar (or to taste)
mixed fresh berries
200g white chocolate
optional glitter!
Method
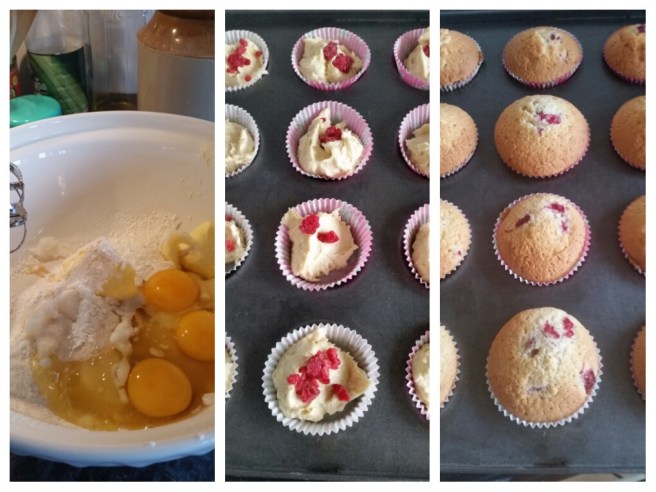
Grease and line two 8″ round cake tins and preheat your oven to around 170oC fan.
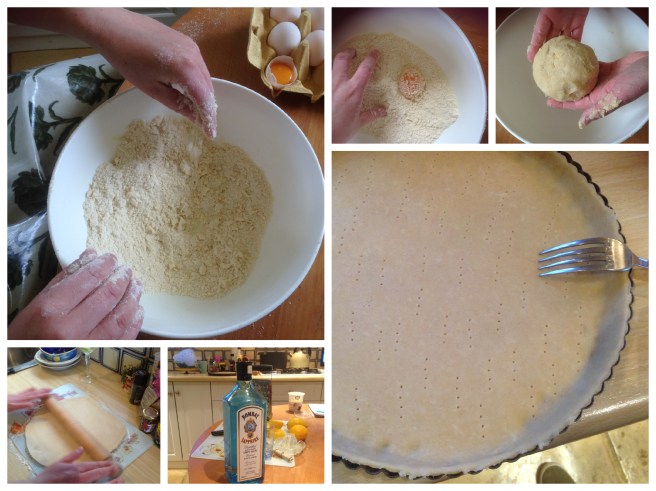
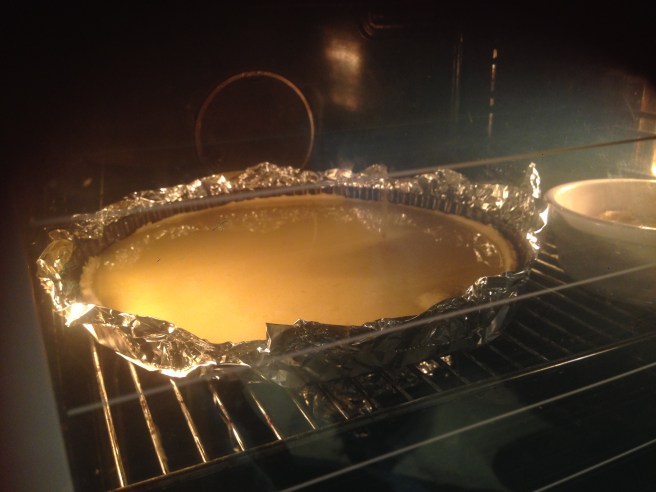
As for a normal sponge, you could easily use the all in one technique but I used the traditional creaming method – cream the butter and sugar together until pale and light, then beat in the eggs one at a time, adding a little flour with the last egg to prevent curdling, then gently fold in the remaining flour. Lastly fold in the alcohol then split the batter between the two tins as evenly as possible (you could weigh the tins if precision is your thing but I just guesstimate). Try and spread the batter with a dip in the middle which will offset any ‘doming’ during cooking. Then just bake in the oven for around 20-25 minutes.

Now I know most chefs will say baking is an exact science, blah blah, but I’m a bit more freestyle with my cooking…. use whatever size eggs take your fancy, if the batter curdles when you add the booze just give it an extra mix and chuck it in the tins, and the oven time is flexible – just keep an eye on them, after 20 mins check and then leave a bit longer if needed. You can check with a cake tester (or skewer/cocktail stick/knife) which will come out clean when the cake is ready but I prefer to just give it a prod – if the sponge bounces back rather than leaving a massive dent then you’re good to go!

Once the cake is done, leave to cool in the tins for about 5-10 mins then remove and leave on a cooling rack until completely cold. Whilst still warm brush the cakes with a mixture of gin and dubonnet – I used about 1.5tbsp but you could use more if you fancy. For a more intense flavour and an even more moist sponge you could poke holes all over and spoon alcohol over liberally (a la lemon drizzle cake).

Next gently whip the cream, adding icing sugar to taste – make sure not to over whip! A good tip is to keep some cream back and then if you do slightly over mix the cream you can add a bit more and fold through to slacken it off. Unfortunately this won’t work if you’ve gone so far it’s turned to butter! Spread about a third of the cream on one of the cakes (if it’s domed slightly during baking then trim it down so the top is level) then top with your mixed berries. I soaked the berries beforehand in gin and dubonnet and a teaspoonful of sugar, then drained them well before using but this is optional.

Top with the other cake and then cover the top and sides with the remaining cream. To make the white chocolate ‘collar’ measure around the cake (actually it’s much easier to measure around the tin!) and also measure the height of the cake then cut a strip of greaseproof paper to size and lay on a flat surface. For the sake of your kitchen you may want to lay a further sheet of greaseproof or cling film underneath as it does get messy! Melt your white chocolate (in the microwave or over a saucepan, either way remove from the heat once around 2/3 of chocolate has melted then beat until the remainder has melted, this makes sure you won’t burn it) and then simply spread over your greaseproof template. You want a layer a couple of millimetres thick to make sure it holds.

I sprinkled glitter on the greaseproof before spreading the chocolate to give a nice finish, I’ve also done this in the past with 100’s and 1000’s! You can also pipe the chocolate to make a design or use patterned transfer sheets for different effects. Leave the chocolate until it has set enough that it won’t drip or run when you move it but not so hard that you can’t bend it. (I have zero patience so I often cheat and slip a couple of ice packs under to speed this up but it’s a high risk tactic as it can set too hard very quickly). Then simply pick up your greaseproof and wrap around the cake – you need to do this quickly and press tight against the cake to hold so this is easier with two pairs of hands but not impossible to do single handed. Then straight into the fridge to set!

Once the chocolate collar has set hard simply peel off the greaseproof. Finally I decorated the top of the cake with more fresh berries and then glazed them. I used the juice/booze mix which I had soaked the other berries in, boiled until reduced by at least half, but you could use jam thinned down with a little water for a nice finish. Then last but not least I topped the whole thing off with a liberal sprinkling of gold glitter! After all, it’s hardly a celebration without some sparkles around.

And it’s as simple as that 🙂

You can read more about baking in honour of the Queen’s birthday with the Fleet, Farnham & Farnborough group of the Clandestine Cake Club, which Vicky runs, here.

You can also follow Vicky (although I feel I should call her Victoria – rather more regal!) on Twitter @vixyvonshock.

Yummy Chicken and Basil Salad, with New Potatoes

My lovely friend Emma has asked me to teach her how to cook. Last night was the first lesson, and I think you’ll agree that she did pretty well!

This recipe serves two people.

wp-1465291614500.jpeg

Ingredients

  • 250g diced chicken
  • Olive oil infused with basil (if you don’t have this, add some fresh or dried basil)
  • 1 lemon
  • 1 pepper
  • 1 garlic clove (or more!)
  • Mixed salad leaves
  • Salt and pepper
  • New potatoes (a handful each)

Method

Zest the lemon, then cut it in half and juice it.

Put the chicken, lemon zest, a pinch of salt and pepper, half of the lemon juice and a splash of the basil olive oil into a bowl and leave it to marinade.

While the chicken is marinating, arrange the salad leaves in a bowl and then chop the pepper into strips. Crush or finely chop the garlic.

Now make a simple salad dressing using the rest of the lemon juice, the same volume of olive oil and 1/4 teaspoon (or less) of sugar; either put together in a jug and give it a good stir, or if you have an empty jam-jar put the ingredients into that and give it a good shake (with the lid on tight!).

Clean the potatoes and put them into saucepan, add a pinch of salt and boiling water from the kettle.

When the potato water is bubbling well it is time to start cooking the chicken. Heat a tablespoon of the basil oil in a frying pan, add the chicken and fry it stirring frequently. When the chicken is sealed (cooked on the outside) add the pepper and garlic and continue to stir. Turn the heat down if the chicken starts to stick to the pan.

Check that the chicken is cooked all the way through by taking the biggest piece and cutting it in half.

Serve on a bed of green salad.

Coconut and Raspberry Fairy Cakes

I made this up at 7.30 this morning – not bad seeing as my brain very rarely kicks into gear until at least 10.00 am!

I needed to bake for the launch of a very exciting project ‘Cake and Conversation’ – an International Cafe for people in Stroud, who are new to the area or feel isolated due their limited English. I wasn’t at all happy with the the flapjack I had made last night (it was not gooey enough for my liking) and, although I had already made my yummy coffee cake, you really can’t have too much cake!

I can reliably inform you that this little invention went down rather well at the cafe.

2016-06-07-17.49.50.jpg.jpeg

Ingredients

  • 5 oz self raising flour (actually, that’s a fib – I had run out of self raising and used Plain Flour with a teaspoon of baking powder, which was fine)
  • 1 oz desiccated coconut
  • 3 oz butter
  • 1 oz coconut butter
  • 4 oz golden caster sugar
  • 2 eggs
  • a good splash of milk (if I had had any I would have used coconut milk)
  • a handful of frozen raspberries

wp-1465318012588.jpeg

Method

Pre-heat the oven to 190oC.

Put all of the ingredients, except for the raspberries and milk, into a mixing bowl and combine well using an electric mixer.

When the mixture is beginning to combine nicely, add a tablespoon of milk and whizz some more. If you haven’t achieved a nice smooth batter add another splash or two of milk. Remember to use a spatula to catch all of the dry bits from around the bowl and then whizz some more. The mixture should be the consistency of Extra-thick Double Cream (if you don’t know what that is, go and get some – it is wonderful stuff!).

Line a cake tin with little cake cases. Put approximately a tablespoon of mixture into each cake case – this should do a dozen cakes with a little batter left over.

If the frozen raspberries are large break them in half (they should just break when you squash them because they are nice and brittle when frozen). Put on the top of each cake and then top with the remaining batter.

Bake at the centre of the oven for about 15 minutes. They should rise nicely and begin to look nice and golden brown on top.


Michelle’s ‘fridge gravel’ supper with lamb

image

This recipe comes from a lovely lady who I met volunteering at Stroud District Foodbank. Michelle is a writer who is in love with her slow-cooker – a lady after my own heart!

Michelle and I bonded over conversations about frugal food and storecupboard cooking, and I have rather fallen for her phrase ‘fridge gravel’ which describes the ‘stuff’ that accumulates at the bottom of your fridge (unless you are a super-organised meal planner!). Here is a ‘fridge gravel’ meal which Michelle cooked last week, and kindly wrote up for me to share with you.

Ingredients
This dish comprised mainly from what was found lurking in the bottom of my fridge, the end of a bag of frozen vegetables, and some cheap diced fresh lamb that was marked down at the supermarket (300g for around £1.50 I think).

The vegetable mix consisted of:
1 small courgette, sliced
1 yellow pepper (that was crushed and discounted), sliced
1 red onion, peeled and quartered
1/2 red pepper, sliced (from the freezer)
About 4 cherry tomatoes, whole (leftovers from a larger tub)

Method
Throw all the prepared veg into a mixing bowl and pour over a generous glug of Olive oil. Sprinkle over some salt and ground black pepper and about a teaspoon of any dried herbs of your choosing that you may have hanging around in your kitchen cupboard.

For this dish I used dried Basil and Oregano, but I often change this according to whatever meat I am including with the dish. For example I have made similar mixes before using diced chicken pieces with Chinese five spice and a shake of soy sauce, or dried mixed herbs and parsley when using diced beef.

In a separate bowl mix the diced lamb with a little Olive oil, salt and ground black pepper, and again whatever herbs you fancy. I added a bit of dried tarragon to the meat to give it a slightly different flavour than the more Mediterranean style herbs used for the veg.

Line a baking tray with tin foil and spread out the vegetables evenly in one layer. Put the pieces of lamb on top of the veg – making sure to spread the meat out evenly and not letting it all clump together.

Bake for about 30 to 35 minutes at 200 Celsius or Gas mark 7 until all the vegetables are tender and the meat is cooked through.

Divide between two bowls and sprinkle over some grated Parmesan cheese (optional) and serve hot.

You can use whatever combination of vegetables you may find lurking in your fridge or freezer, even if they are looking a bit sad and old! I tend to do my ‘fridge gravel’ tray bake once or twice per month when cleaning out the fridge and using up any leftovers I find along the way.

Cheap, tasty and filling. Enjoy!

Tagliatelle with wild garlic and smoked salmon

20160517_183851

Believe it or not, this was a very cheap meal: although that is partly because my lovely parents left me the contents of their fridge before going away. Thanks also to my neighbour James for bringing me a huge bag of wild garlic from his dog walk!
The amounts below served one person; apologies if the quantities are a bit hap-hazard, I made it up as I went along and only decided to write it down afterwards because it was so yummy.

Ingredients
5 – 6 ‘balls’ of dried tagliatelle
A colander full of wild garlic leaves
A chunk of crumbly cheese,  grated
A small handful of salmon, chopped into pieces
A splash of good olive oil
Salt and pepper

Method
Put the tagliatelle in a saucepan with a pinch of  salt and boiling water from the kettle. Start with the hob turned right up, and then when it comes to the boil turn it right down.
Wash the wild garlic, grate the cheese and chop the salmon.
When the pasta is al dente (i.e. ‘just right’) drain it and then add the wild garlic, cheese, oil, salmon and a grind of salt and pepper. Give it a good stir, and when the garlic leaves are wilted and the cheese melty serve.

Quick,  easy, and delicious! image