Yummy Chicken and Basil Salad, with New Potatoes

My lovely friend Emma has asked me to teach her how to cook. Last night was the first lesson, and I think you’ll agree that she did pretty well!

This recipe serves two people.

wp-1465291614500.jpeg

Ingredients

  • 250g diced chicken
  • Olive oil infused with basil (if you don’t have this, add some fresh or dried basil)
  • 1 lemon
  • 1 pepper
  • 1 garlic clove (or more!)
  • Mixed salad leaves
  • Salt and pepper
  • New potatoes (a handful each)

Method

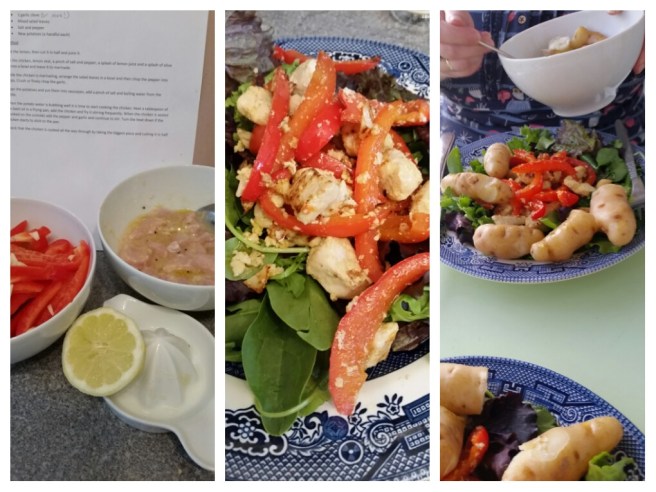
Zest the lemon, then cut it in half and juice it.

Put the chicken, lemon zest, a pinch of salt and pepper, half of the lemon juice and a splash of the basil olive oil into a bowl and leave it to marinade.

While the chicken is marinating, arrange the salad leaves in a bowl and then chop the pepper into strips. Crush or finely chop the garlic.

Now make a simple salad dressing using the rest of the lemon juice, the same volume of olive oil and 1/4 teaspoon (or less) of sugar; either put together in a jug and give it a good stir, or if you have an empty jam-jar put the ingredients into that and give it a good shake (with the lid on tight!).

Clean the potatoes and put them into saucepan, add a pinch of salt and boiling water from the kettle.

When the potato water is bubbling well it is time to start cooking the chicken. Heat a tablespoon of the basil oil in a frying pan, add the chicken and fry it stirring frequently. When the chicken is sealed (cooked on the outside) add the pepper and garlic and continue to stir. Turn the heat down if the chicken starts to stick to the pan.

Check that the chicken is cooked all the way through by taking the biggest piece and cutting it in half.

Serve on a bed of green salad.

Coconut and Raspberry Fairy Cakes

I made this up at 7.30 this morning – not bad seeing as my brain very rarely kicks into gear until at least 10.00 am!

I needed to bake for the launch of a very exciting project ‘Cake and Conversation’ – an International Cafe for people in Stroud, who are new to the area or feel isolated due their limited English. I wasn’t at all happy with the the flapjack I had made last night (it was not gooey enough for my liking) and, although I had already made my yummy coffee cake, you really can’t have too much cake!

I can reliably inform you that this little invention went down rather well at the cafe.

2016-06-07-17.49.50.jpg.jpeg

Ingredients

  • 5 oz self raising flour (actually, that’s a fib – I had run out of self raising and used Plain Flour with a teaspoon of baking powder, which was fine)
  • 1 oz desiccated coconut
  • 3 oz butter
  • 1 oz coconut butter
  • 4 oz golden caster sugar
  • 2 eggs
  • a good splash of milk (if I had had any I would have used coconut milk)
  • a handful of frozen raspberries

wp-1465318012588.jpeg

Method

Pre-heat the oven to 190oC.

Put all of the ingredients, except for the raspberries and milk, into a mixing bowl and combine well using an electric mixer.

When the mixture is beginning to combine nicely, add a tablespoon of milk and whizz some more. If you haven’t achieved a nice smooth batter add another splash or two of milk. Remember to use a spatula to catch all of the dry bits from around the bowl and then whizz some more. The mixture should be the consistency of Extra-thick Double Cream (if you don’t know what that is, go and get some – it is wonderful stuff!).

Line a cake tin with little cake cases. Put approximately a tablespoon of mixture into each cake case – this should do a dozen cakes with a little batter left over.

If the frozen raspberries are large break them in half (they should just break when you squash them because they are nice and brittle when frozen). Put on the top of each cake and then top with the remaining batter.

Bake at the centre of the oven for about 15 minutes. They should rise nicely and begin to look nice and golden brown on top.


Michelle’s ‘fridge gravel’ supper with lamb

image

This recipe comes from a lovely lady who I met volunteering at Stroud District Foodbank. Michelle is a writer who is in love with her slow-cooker – a lady after my own heart!

Michelle and I bonded over conversations about frugal food and storecupboard cooking, and I have rather fallen for her phrase ‘fridge gravel’ which describes the ‘stuff’ that accumulates at the bottom of your fridge (unless you are a super-organised meal planner!). Here is a ‘fridge gravel’ meal which Michelle cooked last week, and kindly wrote up for me to share with you.

Ingredients
This dish comprised mainly from what was found lurking in the bottom of my fridge, the end of a bag of frozen vegetables, and some cheap diced fresh lamb that was marked down at the supermarket (300g for around £1.50 I think).

The vegetable mix consisted of:
1 small courgette, sliced
1 yellow pepper (that was crushed and discounted), sliced
1 red onion, peeled and quartered
1/2 red pepper, sliced (from the freezer)
About 4 cherry tomatoes, whole (leftovers from a larger tub)

Method
Throw all the prepared veg into a mixing bowl and pour over a generous glug of Olive oil. Sprinkle over some salt and ground black pepper and about a teaspoon of any dried herbs of your choosing that you may have hanging around in your kitchen cupboard.

For this dish I used dried Basil and Oregano, but I often change this according to whatever meat I am including with the dish. For example I have made similar mixes before using diced chicken pieces with Chinese five spice and a shake of soy sauce, or dried mixed herbs and parsley when using diced beef.

In a separate bowl mix the diced lamb with a little Olive oil, salt and ground black pepper, and again whatever herbs you fancy. I added a bit of dried tarragon to the meat to give it a slightly different flavour than the more Mediterranean style herbs used for the veg.

Line a baking tray with tin foil and spread out the vegetables evenly in one layer. Put the pieces of lamb on top of the veg – making sure to spread the meat out evenly and not letting it all clump together.

Bake for about 30 to 35 minutes at 200 Celsius or Gas mark 7 until all the vegetables are tender and the meat is cooked through.

Divide between two bowls and sprinkle over some grated Parmesan cheese (optional) and serve hot.

You can use whatever combination of vegetables you may find lurking in your fridge or freezer, even if they are looking a bit sad and old! I tend to do my ‘fridge gravel’ tray bake once or twice per month when cleaning out the fridge and using up any leftovers I find along the way.

Cheap, tasty and filling. Enjoy!

Tagliatelle with wild garlic and smoked salmon

20160517_183851

Believe it or not, this was a very cheap meal: although that is partly because my lovely parents left me the contents of their fridge before going away. Thanks also to my neighbour James for bringing me a huge bag of wild garlic from his dog walk!
The amounts below served one person; apologies if the quantities are a bit hap-hazard, I made it up as I went along and only decided to write it down afterwards because it was so yummy.

Ingredients
5 – 6 ‘balls’ of dried tagliatelle
A colander full of wild garlic leaves
A chunk of crumbly cheese,  grated
A small handful of salmon, chopped into pieces
A splash of good olive oil
Salt and pepper

Method
Put the tagliatelle in a saucepan with a pinch of  salt and boiling water from the kettle. Start with the hob turned right up, and then when it comes to the boil turn it right down.
Wash the wild garlic, grate the cheese and chop the salmon.
When the pasta is al dente (i.e. ‘just right’) drain it and then add the wild garlic, cheese, oil, salmon and a grind of salt and pepper. Give it a good stir, and when the garlic leaves are wilted and the cheese melty serve.

Quick,  easy, and delicious! image

Chocolate and Almond Bread & Butter Pudding

image

Bread and Butter Pudding is a good old-fashioned frugal recipe, which uses up dry bread which would otherwise go to waste. The traditional recipe uses bread and butter, dried fruit, sugar, eggs and milk.

There are many little twists that can be made to this basic recipe; for this one I used Almond Milk instead of cows milk and mixed coco-powder in with the demerara sugar to make nice chocolatey layers.

Ingredients

  • Dry sliced bread (about 1/2 loaf)
  • Butter
  • 2 tablespoons demerara sugar
  • 2 tablespoons coco powder
  • 1 cup raisins
  • 2 or 3 eggs (I only had 2 which was fine, but 3 would have been better)
  • 1 pint almond milk
  • 1 tablespoon flaked almonds
  • 1 teaspoon nutmeg

Method

Pre-heat the oven to 180oC.

Mix the sugar and coco powder in a bowl.

Place a layer of buttered bread in the bottom of your dish, as closely fitting as possible. Cover with a layer of the chocolate mixture and a sprinkle of raisins.

Repeat until you have at least three bread layers.

In a jug measure out a pint of milk and beat the eggs into it.

Pour the mixture onto the bread layers; all but the top bread layer should be covered. Add more milk if necessary.

Sprinkle flaked almonds and some nutmeg on the top and bake in the centre of the oven for about half an hour.

image

Sticky Beer and Ginger Fruit Loaf

I made this recipe up yesterday.

I came back from a lovely wedding at the weekend armed with some delicious Shropshire Ale from Hobsons Brewery left over from the festivities (we were far too well behaved!), which the groom kindly decanted into a pop bottle for me. I used most of the beer on the day I returned home to bribe my neighbour James to cut my lawn and shift some topsoil for me; however, a few days later there was a half pint still remaining which was a little beyond drinking but which I didn’t want to waste.

I had a little brainwave that I could use it to soak fruit in; a little bit like tea-loaf but richer. The muscavado sugar made it richer still and, well, you can’t go wrong with lots of ginger.

Ingredients

  • 500 g / 1 lb of mixed dried fruit
  • 200 g / 7 oz dark muscavado sugar
  • 300 ml / 1/2 pint of Ale (the darker the better)
  • 1 egg, beaten
  • 250 g / 8 oz self-raising flour
  • 1 1/2 teaspoons of ground ginger

Method

Put the fruit, sugar and beer into a bowl, cover with a tea-towel and leave for at least 4 hours (overnight if possible).

Stir  the egg, flour and ginger into the soaked fruit mixture and pour into a lined 2 lb loaf tin (or, if like me you are short on time divide it between two tins so that it cooks more quickly).

Bake in the centre of a pre-heated oven at 170oC for 1 & 1/2  hours. To check whether it is done put a skewer in and if it comes out clean it is cooked, whereas if the skewer still has cake mixture on it needs cooking a little longer.

20160421_161904.jpg


Odds and Sods Soup

I have decided that it is time to go back to my £5 a week food budget – I have become lazy recently, and although I have maintained the discipline of not wasting food it has become too easy to spend more than I need to and to do ‘lazy cooking’.

I have not yet spent my £5 this week, and I did not top up my storecupboard before commencing my budget cooking – no cheating! Before I spend my £5 I need to use up some fresh ingredients; my lovely lodger is working away for a week and has left me with a fridge full of yummy things which I cannot let go to waste, so what I have to start with is:
– a couple of rashers of bacon
– a bag of green salad
– an avacado
– salami & parma ham
– red peppers

Thanks Amy!

I also have carrots which very much need using up, onions, garlic, a lonely potato, a lonely tomato, fresh bread, and of course my trusty spice cupboard.

image

So of course I started with soup.

Ingredients

– one onion
– one potato
– one big tomato
– one red pepper
– six carrots
– 2 cloves of garlic
– smokey paprika
– stock from the freezer (or a vegetable or chicken stock cube)
– salt and pepper to taste

Method
Finely chop all of the vegetables apart from the tomato. Fry in a large saucepan with the paprika and a little oil or butter.
Put the tomato in a bowl of boiling water straight from the kettle; when it has been in there a few minutes you will find that the skin peels off easily.
Add the tomato to the other vegetables along with a pint of stock – I used my turkey stock from the freezer, but you could equally use a vegetable stock cube.
Simmer until the vegetables feel soft when you put a fork in them – about 20 minutes – then blend using a food processor or hand blender.
Return the blended vegetables to the saucepan and continue to cook on a low heat, adding more liquid (water or milk) if you think that the consistency is too thick.
Taste, and season with salt and pepper if required.
Serve with toast and lots of butter.

… and I have plenty left for lunch tomorrow – hurrah!

Teaching James to cook – Part One

I have taken it upon myself to teach my idiot neighbour (his own words!) to cook. James is a bit of a character, an extravert with paranoiac tendencies (again, his own words!). His usual weekly shop includes chips, pie, fish, bread, sandwich-spread, tinned fruit, ice-cream, Pavlova, coffee and, most importantly, Cava.

20160403_181653.jpg
Meet James. He wants you to know that he has cut his hair since this picture was taken.

The first lesson was in making a simple pasta sauce with tinned tomatoes, onion and bacon.  We also added aubergine because I had some which needed using up.

The end result was (…in his own words) Pop-tastic! Not ‘alf!

Ingredients

  • 1 Onion
  • 1 clove of Garlic
  • 6 Rashers of bacon
  • about 6 pieces of pepper preserved in oil
  • 1 Aubergine (not compulsory, I just happened to have one in the cupboard)
  • 500g carton of tomato passata or a tin of tomotoes
  • 1 teaspoon mixed herbs
  • Dried pasta, a cup per person
  • a handful of grated cheese

wp-1460391937026.jpeg

Method

Chop the onion and garlic finely. Using scissors, chop the bacon into chunks.

Fry the onion, garlic and bacon in a little of the oil from the preserved peppers.

When the onion is beginning to soften, add the pepper, aubergine and mixed herbs and fry for a little longer.

Add the tomato and simmer until the aubergine is tender.

Next, put the pasta into a saucepan and add boiling water. Bring to the boil on a high heat and then turn down to ‘simmer’. Be sure to keep an eye on it so that it doesn’t boil over.

When the pasta is al dente (meaning ‘just done’ as opposed to ‘mush’) serve with the sauce and a generous sprinkle of cheese on top; see HERE the little video of James trying to find out if the pasta is ‘just right’.

… what James learned today

  • what al dente means;
  • how to make a simple scrumptious meal; and
  • the contrast between feeding yourself ‘stupid & lazy food’ and easy home-cooked food is huge – it tastes better, goes further, makes you feel better and is cheaper.

…I have a lot to learn but I’m looking forward to the next lesson.

Cranberry Gin!

Cranberry gin! This is a great little invention of mine which I have wanted to share with you for a while. It takes inspiration from my mother’s Sloe Gin recipe and my sister’s Quince ‘Brandy’. I first made it a couple of years ago as an ‘experiment’; it was delicious but rather too sweet for me because I used the same proportions as for Sloe Gin, and cranberries are not nearly so bitter. This year I am making a few slightly different versions to try and ascertain what the optimum amount of sugar is – I’m afraid you will have to wait a good few months for the verdict though!

wp-1459019401229.jpeg
My original Cranberry Gin recipe, and appreciation of the final glass of the first vintage.

Method

First freeze the cranberries – this bursts the skin so that you don’t have to prick them with a fork.

Allow the cranberries to defrost in the fridge and then put them into an empty 1 litre glass bottle along with the cloves – I’m afraid that there is no substitute for dropping them into the bottle one at a time.

Using a funnel, add the sugar and then top up with gin. When there is still a little space in the top, put the lid back on and tip the bottle up and down a few times to mix it. Top up with a little more gin; you want it to be very nearly full, but with enough air at the top that you can tip it up and mix it periodically.

Don’t forget to label the bottle with the proportions that you used!
image
For the first few weeks you will have to tip the bottle every day or two to help the sugar to dissolve. After that, you can put the bottle at the back of a cupboard and ignore it for a good few months.The longer you leave it the better – upwards of six months is best. I tend to make it early in the year – January to March – and then it is ready for next Christmas!

When you just can’t wait a moment longer, decant into pretty bottles using a funnel and coffee filter papers.

wp-1459267025704.jpeg

Kitty’s Vegetable Curry #2

Another vegetable curry – this one Dahl-based. The previous one was pretty darn good if you want to check it out!

image

I have done many variations on this recipe over the years, very much depending on what vegetables I happen to have; also on whether I’m making it as a side-dish which I do quite mild, or a meal in itself which I like somewhat spicier. This time I used carrots, plus spinach and the crumbly cheese which I needed to use up and had also put in my pasta yesterday – very versatile!

Ingredients

  •  1 Onion
  • 2 Carrots
  • 1 clove Garlic
  • 1 teaspoon ground coriander
  • 1 teaspoon ground turmeric
  • 1/2 teaspoon ground Cinnamon
  • 1 teaspoon Cumin seeds
  • 1 teaspoon Mustard seeds
  • 1 dried chilli, chopped
  • 1 cup of Red Lentils
  • 1 pint of vegetable stock
  • A couple of handfuls of Spinach
  • Some chilli salt to taste
  • Approx 1/3 cup of crumbly cheese

Method

Fry the onion, garlic, carrots and spices in oil. When the onion is becoming transparent, add the lentils and stock.

Allow to simmer for about half an hour,  adding more water if it begins to dry out.

Taste, and add chilli salt as required.

Stir in the spinach. When the spinach has wilted serve with a generous sprinkle of crumbled cheese.

… and it was even better the next day with potatoes roasted in coconut butter with mustard seeds and black onion seeds :).

image